I love giving handmade gifts and I especially like giving ones that can actually be used in some kind of practical way! Fleece blankets are warm and durable and great for the park, camping, the baseball game, or wherever you go (even if it's just your couch)! I've made a couple of these for friends, family, and even myself! I, of course, learned through clicking on a bunch of pins, but this one is closest to the method that I continue to use. (She has way cooler tools than me though!)
Disclaimer: I hate measuring, so all measurements given are approximates and you can do with that what you will. Measuring is for suckers!!! (I say until my stuff doesn't work out... haha!)
I picked out a Sanrio character print for one side and a somewhat-matching pink for the other side. I don't usually like to do a print on both sides, because it just looks too busy. The little girl this blanket was for was having a Hello Kitty party, so I wanted to keep with the theme! A few years earlier, I gave her brother a Yankees-themed blanket for Christmas, so I wanted her to have her own similar, but distinct, blanket.
The first step is to cut all of the selvages off of the edges of the fabric. It will be on two sides. Usually one side has printing on it, and the other will not. It can be kind of tricky to see where to cut on the side that doesn't, especially on fleece.
If you look closely at the side opposite the printing, you can see two tiny rows of punctured dots. This is actually on the printed side, too. When I cut off the selvages on my fleece, I use these dots as a guide.
My pile of selvages!
The next step is to stack your two pieces of fleece together so that the edges match up and the two wrong sides are facing each other. Rarely are they exactly the same length. To maximize the usable part of each piece of fleece, I match one corner exactly, then smooth the rest out. I used my bed to get a big, flat surface to work on. When I felt like they matched up as closely as I could get them, I cut off the excess to make sure they were the same size.
Next comes the cutting! Now, when I was learning how to do this awhile ago, one blog (not this one I pinned) suggested using a ruler and measuring all of these cuts in advance. WAY TOO MUCH WORK! Especially when after you tie it all up, the edge is going to be kind of messy anyway. If you're the measure-y type, try cutting a 5" x 5" square off each side, then measure each cut to be 1"-1.5" wide and 5" long... or just wing it like me! Either way, I'm sure you'll get good results.
The "thumb" method of measuring... just made that up.
Here it is all cut up and ready to tie!
So, the thing about these knots is that however you decide to tie them, you've got to stay consistent. I like to tie my knots so that a bit of the color from the other side of the blanket shows. I've seen versions on Pinterest that have the knots showing the same fabric as the side you're on. Just try it out and see what you like. I do two overhand knots in a row.
Here's the second pass.
...and all tightened up!
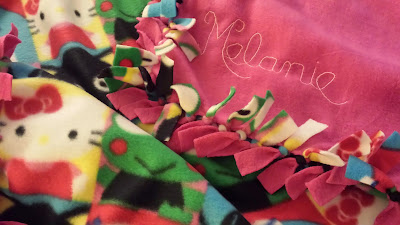
I make my way all around the blanket, tying the knots the exact same way each time. It's helpful to have a movie or some guilty-pleasure TV show to hold you over as you tie all these knots! I stop in the bottom corner and leave myself a foot opening so that I can embroider the child's name on the blanket. It's a nice extra touch, if you have the time. I think it also makes it more special for a kid than just any old blanket. I clearly remember a towel that my grandmother bought for me when I was 5 or so that had my name and ballet slippers on it. I loved that towel more than any other towel we owned, through there were better quality ones in the house, simply because it had my name emblazoned on it.

I used about four strands of embroidery thread and an embroidery needle to make her name. I used the chain stitch. I didn't make a stencil or anything. I never do really. It's kinda like measuring. I think I probably could have done a little better on the cursive here, but for winging it, I think I did alright!
All done! A front/back view.
All tied up and ready for gifting! I used the extra part of the printed fabric that I had to trim off (because the two pieces of fabric were different sizes) to make a pretty bow. I rolled up the blanket so that her name was on the top. I really enjoy making personalized gifts for children, especially when they're practical!


